Tuesday 26 February 2013

Blue Skies

Amazing blue skies, and not a cloud as far as the eye can see, so pretty... blumin' chilli though.

Mr Blue Sky,
Please tell me why,
You had to hide away for
Sooooo looooong!


I'm trying to get on with loads of tidying before the grass starts growing again. I prefer to be outside when we have new chickens too, we are surrounded by dogs and I just need to know that the girls are safe and know where home is.

I know y'all are popping by to see how well the work is going on the stairs, but I don't think you can blame me for spending all my free time out working in the garden.

I'll have to go and check if the other ladies are getting on well on the Staircase challenge - I noticed already that Kit wasn't getting much done either, Micha is making slow but steady progress and I think Sarah looks like she is winning so far.


Monday 25 February 2013

Hey Little Hens!

On Thursday we got our first egg of the year from our old lady chooks - they are more than 3 years old,  so practically pensioners. Our flock had shrunk down from 5 to 2 and we had been planning for a while to get more hens.

The taste of those first few eggs over the weekend had our minds made up, and on Sunday afternoon we went to pick up our new girls.

Here they are getting to know their way around the run.

Our first chickens were all hy-lines, a red-brown chicken that lays around 320 eggs a year for the first few years, hy-lines (or the very similar ISA browns) are generally the sort farms use to give maximum egg production for little cost.

Our 2 remaining Hy-lines - big fat old girls.
This time we went for something a little different and picked up 2 speckledy hens just for a bit of a variety (... um... so we can tell who is old and who is new) They don't look very speckeldy yet, I am hoping they will when the get a bit bigger.


The new girls are 13 weeks old or so and should start laying in 6 - 8 weeks, around about Easter.

The chooks all need to find their place in the pecking order now, it can be hard to watch. The older, bigger girls peck the little ones. They are in the same run at night, just roosting and sleeping when it is dark, so they get used to each others smells. During the day we let them out to free range (under a watchful eye) The new girls couldn't work out how to get out of the run anyway, but it gave them a break from being bullied, poor things.

In a few days they will have figured it out and all be one happy flock.

We did try to find Cream Legbars (a blue egg layer) but just couldn't get them around here just now. If anyone local knows of any available please let me know.


Friday 22 February 2013

How to make... a Homemade Twister Game

We made this on a cold winter's afternoon, it was fun to make, and fun to play with.

You will need:
A roll of paper
Scissors
A roll of sticky-tape
A large plate
A pencil
Colouring crayons (red, blue, green and yellow)


Cut 3 equal lengths from the paper roll (around 6' long) and tape them together to make a huge square of paper.

Draw a grid of 16 circles (4 x 4) using a pencil to draw around the plate.


Colour each row a different colour with crayons. - This bit was fun.


That gives you your playing 'board'


I made the spinning selector piece by using a square of paper with the colours and hands and feet written around the outside.


We used a piece of lego as a make-shift spinner - you could try making one out of cardboard or something


If you don't know the game it goes something like this:
One person is in charge of the spinner.
One or more people are on the board.

You spin and call out where the pointer lands (eg. left foot, red)
The people on the board have to put their left feet on a red dot on the board, and keep it there. The spinner spins again.
You are only allowed to touch the board where the spinner tell you to.
If you fall over you are out of the game.

We played many variations, younger kids can enjoy hoping from one colour to another, or the spinner can call out different instructions to each player.

Thursday 21 February 2013

I Found an Egg = It Is Spring!!

I don't know when the official start of spring is but our chickens have just laid their first eggs since October so I have decided it is, in fact, Spring.

Yipee!!!


If you have ever thought about getting chickens but haven't got round to it, please do. Especially if you have young kids, and can keep foxes and dogs out. Having a few chickens can teach you so much about food, farming and animal welfare. Plus the eggs you get from own chickens will be the best you have ever tasted, especially if you let them roam around a little and eat plenty of grass.


We have had chickens for 4 years now and there is still something magical about peeking in the nest box to see that some eggs have magically appeared.

We need to top up the nesting material, the girls seem to have worked a hole in it.

Our girls are healthy, friendly chickens, they are ridiculously tame, they can behave a bit like cats, doing figures of 8 between your legs as you push a wheelbarrow up the hill. They peck out of curiosity so we do need to keep gloves on, or they'll give a nasty nip.  We've never named them and we're quite glad of that, because we don't get so upset when Mr Fox managed to get to them. But we love having the little critters about, and we love the fresh eggs!!


They also kindly eat every slug they can get their little beaks on, our mini-holding is organic so the chickens are our #1 pesticide.

The girls spend most of the winter cooped up in their little run, but they spend the summer out and about, roaming the garden, scratching in the dirt, pooping all over the place and pecking at the grass and herbs. They are so funny to watch,

We are planning on getting a few more ladies to increase the flock, this time we want some blue egg layers, if anyone local to us knows of any breeders, give us a shout.

Tuesday 19 February 2013

The Staircase Challenge: Week 6

Well now I am just about loosing my patience / motivation with these stairs.

I am getting side-tracked at almost any opportunity, not that I got donkeys at the weekend or anything crazy like that... but I did spend a lot of time in the garden, in the sunshine, turning compost, planning the next big digging project and generally strolling around looking at things.

Meanwhile, John is sanding every square inch of the stairs... these will be the smoothest stairs known to man FACT!


We have now sanded off a good proportion of the undercoat, which will all need done again - I really didn't think they needed so much sanding, but who am I to stand in the way of ultimate smoothness?

If I don't get to start painting these stairs sometime soon, I may start gnawing on things.


Some of the competitors are nearing the finishing straight, a few of us feel we are still on the starters blocks. Please pop over and support the other duellers


Monday 18 February 2013

An Afternoon Spent Under the Sink

We had a drip, a slow drip, it was under the utility-room sink. The pipe work was a bit of a mess and regularly would get bashed when removing bottles of fabric softener and such things. I'd imagine that is why it began dripping. (woops)


So I switched off the water, and tackled it with spanners.


Now flexible pipes are never all that flexible, and there never seems enough space for all those inlet hoses and waste pipes under a kitchen sink. Let alone space for my elbows and hands. 

I had to undo the network of pipes, try to find a better layout and put it all back together. It took 2 hours.

Then I realised we need to get some different shaped bits.


The water needed turned back on, the dinner needed cooked and I needed a wee, so I had to make do with what was there, for now.

But at least we no longer have a drip, so basically, it's all good.


Saturday 16 February 2013

Compost Turning - My 3 Bin Method

Today was the first day I was able to get back into the garden for a long time. We are having a mild few days and I am making the most of them.

It is way too early for planting anything here yet but there is loads to do in the garden at this time of year.

I always do a big tidy up in late winter and this is the time of year I try to get my compost rotation sorted.

Left to right; bins 1, 2 and 3.
We have three giant compost bins right at the back of the garden, where mice and mini-beasts roam free. We bought the bins off of the council when they were super-cheap. They are easy to use and, unlike the rest of the garden, they are tidy

Bin 1 is the one in use, today I was raking up leaves, pulling dead weeds and clearing the polytunnel, it all got put in this bin.


Bin 2 is half-cooked - it was filled in the autumn, and has mostly rotted down. There is still an amount of dry grass and cardboard visible on top.


Bin 3 is ready, there are still some bits of dried grass, leaves and eggshell in there, but it is good to go.


To make the best compost, you need to turn it at some point. The compost in the middle will be ready sooner than the stuff around the outside, so you need to turn its outsides to insides and its top to its middle. Also, as compost cooks, it shrinks and in 6 months the pile is only half the size.


My method is to move the half-cooked pile (in Bin 2) on top of the new pile (in Bin 1) In about 4 months I will move this whole pile into Bin 3 and it will be ready to use about a month later.

Another good reason I do my compost this way is that it moves those helpful little compost worms right to where they are needed most and it speeds up the process.

If you look closely you can see lots of little red compost worms
The compost gets worked on about 3 times a year, it used to be a day-long back-breaking job. Until we figued out my 3 bin method and bought a long handled shovel (instead of using a spade) Now it only takes about an hour... it is still a good workout but not nearly as painful as it used to be.


We actually have another 4 compost bins spread around the garden, I have different methods for them, but that can wait for another day.

Friday 15 February 2013

Win a Wood Burner : Competition Time!

The competition is now closed, Thankyou.


We got our woodburner back in 2007, it was the first thing that we did to make the cottage ours. The cottage did have an open fireplace but to be honest it sucked away as much heat as it created. As soon as we had the stove fitted our Cat decided where her favourite spot in the house was.

I think there's a primeval urge to light a fire in the winter, clicking a switch on a white plastic box just isn't quite the same. Woodburners are efficient as well, much more than an open fire. You can regulate how fast the fuel burns and sometimes you can get the wood for free; We have warmed our cockles over many a pallet and felled trees from local farms.

Our sponsors over at HotPrice are currently running a competition to win this cute stove.

HotPrice Facebook Competition

The model is DEFRA approved, so even homes in smokeless areas (eg. most cities) can burn wood.

So pop over to the HotPrice Facebook Page and share the photo for a chance to win.

Closing date is 1st March.

While you are doing Facebook things, don't forget to like the Our Handmade Home Page over there too, we'll keep you up to date with our goings on down here at Chez McG.


Full Disclosure - This is a sponsored post brought to you by the people at HotPrice.co.uk  
Click here for more details about our advertisement deals

Thursday 14 February 2013

Instant Chocolate Cake for One - Recipe - Happy Valentines x

Here is a little Valentine's gift from me to you to help the evening run it's course a little smoother. I'm talking about those 3 special words...

Instant - Chocolate - Cake!


Whether you are sitting in alone tonight or sharing sweet nothings with the love of your life. Maybe you are even an anti-valentines person, well, lucky for you this cake is brilliant anyway and really has very little to do with Valentines, I'm just sharing it 'cause it is YUM!


This is a chocolate cake of the instant gratification variety. I'm not going to pretend that it is as good as a Nigella Lawson Chocolate Fudge Cake (my personal favourite) but it takes 2 minutes to make it... literally 2 minutes from getting the flour out to shoveling it into your face... 2 minutes!!!

HEALTH WARNING - Please eat yummy cake responsibly.


You will need

  • 1 microwave safe mug
  • 1 microwave

Ingredients

  • 1/4 cup self-raising flour
  • 1/4 cup sugar
  • 2 tbsp cocoa
  • pinch of salt
*stir*

  • 2 tbsp butter
  • 3 tbsp milk
  • optional - 1/2 tsp Vanilla extract or Tia Maria

*stir thoroughly*


Microwave on full power for 1min 40seconds.

*Apply to face!*

This is from a recipe I pinned a few weeks ago, but I have altered it to improve the flavour.

I'm off to snuggle down with Mr McG and a mug of chocolate cake and watch some Carry Grant movies.

Enjoy!
and
Happy Valentines
x

PS. I've been busying away in the back rooms of the blog making it all pretty. I'd love to hear what you think. Also, if anyone is interested I'm launching advertising and have some great deals on right now!

Tuesday 12 February 2013

Staircase challenge: week 5

We are still progressing with the stairs, just one step at a time... HA!

Saturday morning we were starting to sand the entire staircase for a nice smooth base for the paint to go onto and the sander made a kind of hudududud. The pad was oscillating, just very slowly.

We like to fix things, we don't take things to a repair man, we take them apart ourselves (carefully and methodically) We buy the parts we need on Ebay, they rarely cost more than £1.

Top Tip -  A blank sheet of paper acts as both a notepad and a holding station for the screws or other little bits.
A few minutes googling told me the most likely cause of death of a sander is the carbon brushes for the motor. Now it has been a long time since I took apart a motor (I went through a few teenage years of taking stuff apart, or painting stuff, sometimes I'd take it apart and paint it) So another quick google of an exploded view of a similar model, so I knew what I was likely to find, and then I got my tools out.


My little helper sat and took photos of me taking the sander apart, she is 6 and a chip off the old block, though I dare say, she'd still prefer I played with Barbies more.


I checked the brushes, they were fine, I took the motor apart to clean all the dust and debris out of every crevis, I fixed the problem with the sticky trigger switch. I put her all back together and she still wouldn't run properly. Sometimes power tools just die.

We certainly got our moneys worth out of her, she was the first sheet sander we owned, she helped us with floors, with stairs, not least with the walls, and one of our more domestic chores of sanding down the sewing machine.

So long, and thanks for all the oscilating. (does that work, um, no, not really)

So we stopped in at Screwfix to buy a shiny new sander. In a case! and with yellow buttons!! (also has variable settings, is slightly more powerful, has velcro style attachment for sandpaper and also clips and still has dust extraction)


In the mean time we spent the weekend sanding the spindles to a perfectly smooth finish, neither of us have any fingertips left.


We still need to finish off the sanding the flater sections with the new sander.

Now I'm off to see how the others in the challenge are all getting on (I dare say they have got further than us and our 5 weeks of sanding) I might have some paint on by next week... might.


Monday 11 February 2013

How to patch work-trousers : Sewing by the seat of my pants!

I have several pairs of old jeans that I just use for working in (or shlomping around the house when I can't be bothered getting properly dressed)

These jeans see a lot of wear and tear while I crawl through loft spaces, or dig in the garden or sand the floors.

After a few months they are bound to get a hole...  and y'know what? I always get holes in the same place... and no, it isn't the knee, it is somewhere altogether less polite... and it can get pretty darned drafty with a hole in those parts.
The following method will work anywhere you get a hole on your trousers, but you might struggle getting your leg over a sewing machine if the holes are in the knees. (no more innuendo I promise, well, maybe just a bit)


Every pair of my work trousers gets patched at least once. I'm not about to spend good money on trousers just to work in.


Today, I realised that 2 out of 3 pairs of working trousers had just such holes and I needed to patch them.


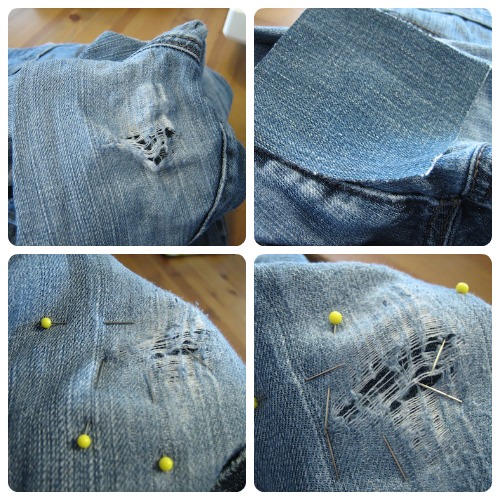
Start by finding a patch that will cover your hole (no giggling, you in the back) My patch came from a pair of jeans that died several years ago.

Put the patch on the inside, behind the hole, making sure it is lined up and pin it in place. You should make sure the little section you are working on doesn't get pulled or stretched and it should sit neat and square on the patch. 

Pins should face into the centre, this will be perpendicular to your stitching line (pins sitting this way can stay in while you sew). I always use loads of pins, watch out for those fingers.

Now get your sewing machine set up, use a straight, medium length stitch (I used my electric sewing machine, it was a little dark to use my treadle, you could hand stitch if you like)


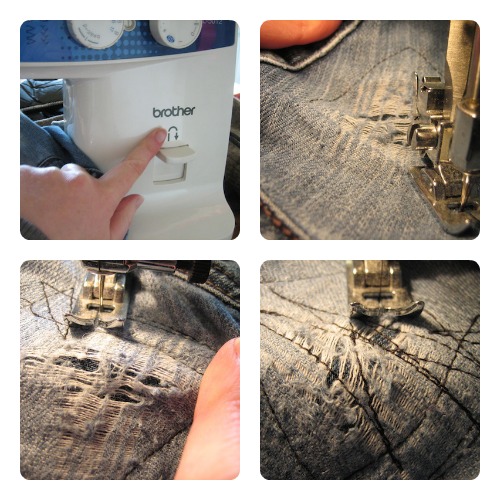
Start by running a square of stitches around the hole to hold the patch in place, then remove your pins.

Always turn a corner by keeping your needle in, lifting the foot, turning your work and lowering your foot again. (as shown above)

You must keep the small area you are working on as straight and flat as possible. This is really tricky on the ass part of trousers, you will find the rest of the fabric getting in the way somewhat.

Now comes the fun bit. (I don't get out much)

Find the backwards button on your machine, this is a swith or button that tells the machine to sew backwards (usually used to sew 3 stitches backwards when finishing a row of stitches)

Starting at one corner of your square randomly go back and forth over the area.

Be extra careful going over loose parts of the torn section but do stitch right over them. This holds everything in place and stops the hole from growing.

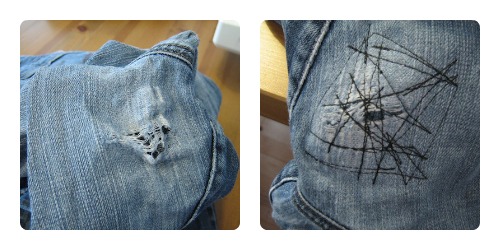
You will end with something like this, it all looks a bit punk don't you think?


And my butt shall be draft free for another few DIY sessions.


Note:
I only used black thread to show up better on your screens, if done with a matching thread colour the patch is much less noticeable.

Thursday 7 February 2013

Blog Building

I'm working on a new group blog for local home-educating families.


I am no expert in this blog prettying malarky but it is fun to play around with layouts and colours.

I have built a banner on picmonkey which I highly recommend (a free to use photo editor and collage creator) though it runs mighty slow on my Macbook - what is it with Mac and flash?

Glasgow Home education Group Banner


Anyway, I've still got a list of things to go and prod in the back rooms over there. Once I'm finished over there I think I'll come and dust off the cobwebs round here, about time for an updated look.

* * *

We meet up with our home-ed group as often as we can, usually once a week. It gives us all a chance to play and chat with our friends, these days it also gives us parents a chance to get numb toes from standing in the cold while the kids run around after each other.

One benefit of being the only school age kids in the park is that we often have staff or volunteers offering to give us a free tour or asking us to join in. The kids are really keen to help out and the staff are always thrilled at how attentive they are.

The girls helping fill up bird feeders
Luckily, there is a team of us posting over there, because once I get back to work on those stairs I think I would implode if I had to update 2 blogs.

Tuesday 5 February 2013

1 Step Forward 2 Steps Back (Staircase challenge: Week 4)

Well, the good news is, we no longer have colds.

The bad news is I have had literally no time to work on the staircase... shall I tell you for why? well, it's my blog, so I will.

We had family over visiting at the weekend. There's a limited amount of times you can say "Sorry we're varnishing the floor / painting the stairs / plastering the ceiling" before it really starts looking like you are a wanna-be hermit. But it is so lovely having peeps over and it reminds us why we are breaking our backs doing all this work.


Now, because our open-plan mega-room is the whole of the downstairs (livingroom + den + study + staircase + kitchen + diningroom) we can't just close a door and hide everything. Plus my 4YO niece was joining us, so all the tools and materials had to be cleared out of the mega-room. Still it gave us a good excuse to have a proper tidy up, wash the dust-sheets and run the hoover round.

Friday and Saturday were written off. But it is OK I could still get going with the stairs for at least a few hours on Sunday (before visiting my mother in the evening)


But that was before the injuries happened. I injure myself on the most random things, do read on.


In the process of shaving my legs - 'cause between the drilling and filling and hammer-wielding I occasionally like to pretend that I am just a teeny bit feminine. I managed to gouge off a chunk of my thumb... on the plastic cap of the shaving gel bottle... not on the razor I was holding in my other hand... that would have been too conventional for the likes of me.

The next morning while baking with Small, I managed to slice my finger open... on the glue from the top of a flour packet.

SERENITY NOW!


Oh, but it doesn't end there...
I woke up on Sunday morning with a badly twisted back which has just wiped me out since.

True to form I didn't pull my back muscles lifting anything heavy, lugging a wheelbarrow for 8 hours, twisting, bending, carrying or balancing up a ladder while plastering, painting or sanding (all of which I do on a fairly regular basis). I managed to pull a muscle in my back while sleeping.... I don't even know how that is possible.

So, I'm still nursing my injuries from a plastic cap, the flour bag and sleeping. (I'm nothing if not consistent)

To cheer me up I found our big old subway sign that will hang in the stairwell once we are all done. It has hung in every house I have called home, I'm really looking forward to hanging it again :)


I'm sitting out for a bit in the hope that I get better in a few more days. I'm spending my down-time  pinning stuff, learning Spanish, teaching Small... and also watching The Muppets.

Hopefully I'll have more to update on next week. In the mean time check out how all the others are getting on (at varying speeds) with their staircases


Any tips on fixing a pulled upper-back muscle would be greatly received.

Monday 4 February 2013

10 ways to save money in the kitchen (The £50 weekly budget)

A few weeks ago I shared 15 tips to save money when grocery shopping. This week I am delving into the kitchen and letting you know a few of the ways we save money when cooking.

I'm trying to keep this series of posts open for anyone to try. You should be able to take on board any of these tips easily, whatever size of household you have, whether you are a town mouse or a country mouse, a busy working mum or a thumb twiddling time waster.

I've already covered the merits of meal planning which goes hand-in-hand with grocery shopping, but the following tips are more specific about how you might save money eating, preparing and storing food in the kitchen.
  • Cook - Not opening jars of stir-in-sauce... I mean really cooking. The best way to learn to cook well is to watch and help your parents and grandparents in the kitchen... but that has fallen out of favour in previous generations so failing that, get yourself a good basic cookery book (my favourite is cooking for blokes) Get practising with the basic meals that you and your family enjoy. There is no need to get adventurous until you have 4 or 5 basic recipes under your belt. 
  • Cut down on the meat - Meat is expensive, good meat is more expensive and ethical meat is even more expensive. Your protein intake doesn't have to be meat-based (lentils, pulses, eggs and dairy are also good sources) but even if you do like meat, most of us eat far too much of it. The dept. of health recommends roughly 70g of red or processed meat a day,  I've heard that is is roughly the size of a deck of cards. Which means that decent beef steak would easily stretch to a family of three or four. Think about how you serve meat and maybe try to cut down the size of portion.
  • Get saucy - I'm talking pasta sauce and curry sauce here. The standard 'meat and 2 veg' is difficult to do on a budget but once you dive into the amazing world of sauces there is no stopping you. Sauces are easy to bulk up with cheap produce, they are easy to batch cook and freeze. They can be healthy, hearty and quick.
  • Say hello to lentils - lentils are a so called 'superfood' because they are amazingly healthy. They also thicken up a soup or a stew, add bulk to any minced meat dish, and best of all, lentils are nice and cheap. If you can find a good recipe for lentil soup and Dahl (lentil curry - I'll share my recipe one day) you can feed your whole family filling nutritious meals very cheaply, and the lentils keep so well they are a good store cupboard food.
    Red lentils are cheaper and mushier, green lentils are nutty and hold their shape better.
  • Bulk it up - This works particularly well with mince (ground beef) ie. in bolognese, chilli or cottage pie. Match the weight of meat to a selection of grated veg, and add a handful of lentils. Mushrooms, carrots, courgettes and celery all work well for this trick. Stir the grated (or finely chopped) veg into the pan once the mince has finished browning, add a beef stock cube and a handfull of lentils. You just made 1 pack of mince stretch double the distance.
  • Batch cook - once a week I make a huge pot of sauce, we eat it that night and the left overs get frozen for other meals. We usually get 12+ servings out of one pot. My favourites are - Chilli, Bolognese sauce, Pasta Sauce (with chopped up sausages), Dahl (lentil curry), Sausage and bean casserole or any kind of soup.
5.5 litres of Chilli - that is about 15 portions.
  • Bake - Well we could technically roll this in with cooking but I see it as a very different process in the kitchen. Homemade cakes and treats are much cheaper and usually tastier than there shop bought equivalents. Try my cinnamon bun recipe for a cheap baking fix. 
  • Portion Control - Don't over-feed yourselves, or fill plates too much for tummies to manage. Portions should be sufficient, but if you are still hungry 5 minutes after clearing a plate you can have a refill from the pot, a slice of bread or a pudding from the fridge. Here is my rough (and I do mean rough) guide to portion sizes.
  • Rice - 1 cup for 2 adults
  • Pasta - 90g per adult 
  • Potatoes - 2 to 3 medium per adult (adjust to suit sizes of potatoes available)
  • Pasta sauce or curry - 1 cup/ ladle per adult
  • Soup - 2 cups/ladles per adult
  • Love Leftovers - Planning for leftovers can help save money yet again. Left over sausages or bacon can be added to a pasta sauce the following night, or pop them in the freezer for future use. Left over veg can be whizzed into a homemade soup. Left-overs from a take-away treat can easily be reheated for another meal or kept in the fridge for a day or 2 for a late night sneaky-snack. Most things can be zapped in the microwave and/or popped under the grill to reheat them - pop pizza or chips in the microwave for 2 mins and under a hot grill for a further 2 mins - always make sure re-heated food is piping hot before serving.
Left over curry from the indian take away.
Reheat in the microwave and omnomnom
  • Freeze it - Invest in some stackable freezer boxes (or keep a hold of some of those take-away containers) and some bag clips. Your freezer is the best way to keep food good and fresh, plan ahead and stock your freezer well for emergency quick meals or to extend time between supermarket visits. And my top tip for the freezer - LABEL IT! label everything, label what it is and how many it might feed, and maybe even the date you froze it. Remember to clear out your freezer once every few months and toss what you will not use. Do not waste freezer space on tubs and bags that you can't remember the origin or contents of.


Here are a few other tips that didn't quite make the grade but I feel, since I had them all thought out I might as well pop them up here.

  • Slow cookers and Pressure cookers - These are great pieces of equipment and they can save you a lot of money. They save energy and time cooking and are especially good for cheap cuts of meat. The down side is that you need to buy them to begin with, and that initially expense can take a while to re-coup. If you get one off of freecycle or gumtree then you are on to a winner.
  • Growing your own - In the middle of winter and with the snow falling outside it is easy to forget that we grow a lot of our own fruit, veg, herbs, and eggs and it does save us lots of money. But I know that lifestyle just isn't available to many people, some don't have the time, some don't have the space and some don't have the inclination  I would recommend you try to grow a few windowsill herbs at the very least but really because they are nice to have around, not because they save you loads of cash.
  • Foraging - If you can find a great foraging guide, you have a good place to go foraging and you have the time to do it then foraging can be brilliant. The occasional handful of blaeberries and brambles we pick don't save us tonnes of money but they do make our summers days a bit nicer.
  • Jam and Chutney making -  I do make lots of jam, marmalade and chutneys, this is because homemade jams and chutneys taste better. But not because it is cheaper. The sugar alone can cost more that a store bought cheap jam (30p for 1lb and you even get a free jar)
  • Wine making - now here you can save a lot of money, I have made some lovely country wines, but we don't drink (a couple of glasses a month, at most) so it does seem like a rather pointless money saving escapade.

Have you got any other tips to help us all save a bit of money with food in the kitchen? Leave a comment below and let me know your best ideas.


Next up in the £50 budget series will be cleaning on a budget.
Related Posts Plugin for WordPress, Blogger...